Saturday, 21 May 2011

Trialing a craft kit

A crafting friend of mine, Claire from Beautiful Things by Claire Mackaness (look her up on facebook/twitter) has decided to start making craft kits. Before selling them though she asked for volunteers to trial the kits and give her a review so I volunteered to try out her tote bag kit.

I loved coming home on Thursday to find a little pink package on the mat. I know it’s only a small thing but it was the start of feeling like I’d got something special. As soon as I opened it I thought it looked very professional in the packaging and quickly opened the kit.


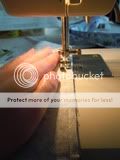
I have to say that I did find 5 pages of instructions a little daunting and wondered what I’d let myself in for but started to follow them step by step, running up and down the stairs to keep ironing various pieces of fabric, then coming down to sew them together.


It was simple to follow the instructions, so I needn't have been worried, and time flew by.


I also had a little hiccup adding the felt squares that covered the handle joins when it said ‘press the square for 10-15 seconds until the glue melts’. I literally pressed it and nothing happened. As someone who’d never seen sticky backed felt I didn’t realise straight away that it meant to press with an iron, oops! I felt very 'blonde' but I reckon Claire will not amend this before the kits go on sale.


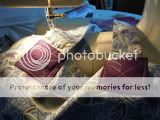
I had another little mishap when my stitching didn't quite go straight- not due to my poor sewing skills obviously, there must've been something going wrong with the machine!!!!  or perhaps I was getting distracted by this going on near my feet.....


Around 75 mins after I started I had a completed, gorgeous tote bag.

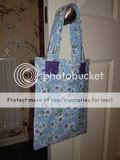
So if you were to ask if I’d buy other kits the answer would be yes, as I found it easy and fun to do.  I reckon the kits will be a top seller in no time at all.
Good work Claire :o) Feel free to add a link to your etsy shop in the comments so people can easily buy them.


Saturday, 14 May 2011

fusing workshop

A few months ago I was contacted about running a workshop for 5 friends. This quickly grew to 7 friends and then to 9!! At this point I had a minor panic wondering how on earth I was going to fit 9 people into my house to teach them at the same time. I looked up hiring the village hall and thought about hiring extra tables to have a home but however I planned it out it wasn't going to work. I was also worried about being able to teach 9 people well enough so that they had individual help with their work. The only answer was to teach in 'shifts' with a group of 5 and then of 4 which thankfully the group were more than happy with.

The day started with tea, coffee, lots of chatter and a reunion with an old friend from down under. You could tell straight away that they were going to be great fun and were here for an enjoyable day whilst learning something new.


The coaster making went pretty smoothely but by the time they were onto suncatchers the making group were being 'helped' by their friends who couldn't resist giving suggestions on their designs. I guess it should have been predicted once they all had a basic understanding of working with the glass. It was quite nice really although they often joked about being in competition with the opposite group or telling them to stop heckling them- all good jesting :o)


Some chose to chill out in the garden reading some of my glass books and we all popped out to see the impromtu air show over head. I've never seen planes doing loop the loops over my house before today! Southend have their airshow in 2 wks so perhaps we saw their practice.


Friends 'helping' each other out.


The kilnful of glass created today. 9 coasters of varying design and glass cutting.

Gill who made the beach huts very nearly bought a piece like this last week in Burnham and was chuffed to bits to be able to make her own one.


At the end of the day I felt like I'd spent the day with my friends and was feeling about as chilled as they were and then came to shock of a clap of thank yous...now that's not something you get everyday :o)

Monday, 25 April 2011

peacock eyes


Nothing like leaving things til the last minute is there!
My leaded window design has been coming along nicely but so far I've managed to do the 2 easiest of the 6 sections and haven't got round to fusing the eyes of the peacock's tail. In tomorrow's eve class I'll be doing a bit of soldering on panel 2 but will then be ready for the tail and the challenge of the century!!! Now that I'm ready for the tail parts I really need the peacock eyes done and there for leading into the design. (See what I mean about last minute now!) So today was the day for getting it done.

I'm using lead crystal glass that I've been using for my castings as having done a few flat experiments with it I realised it would be perfect for what I envisaged.
I set myself up on the table in the conservatory with the leading design, peacock images, bags of glass, a kiln shelf to position the glass directly onto and was joined by a hot and bothered cat stretched out under the table!

But then disaster struck!!!! I ran out of glass eek!!! (ok I know I'm being melodramatic but I am impatient!) Luckily Glass From The Past, where I get my glass from, is pretty local so I jumped in the car and bought another 8 bags which should keep me going for a little while.


So disaster averted and I finished all the 'eyes' on the left hand side of the design.


When the come out of the kiln tomorrow morning I'll be able to pack them into a bag ready for the eve class when I'll cut and grind them to fit into the design perfectly.  


But before then I've got lots of 16yr olds to prepare for their final GCSE Art exam on Weds/Thurs....I'll need another 4 day wkend to get over this chaotic wk :o)

Sunday, 24 April 2011

new casting sculptures

What a gorgeous bank holiday weekend and school Easter holiday. For days now I've been able to enjoy eating every meal al fesco on the patio and have had 2 bbq's which is just amazing for April. I could get used to this :o)
Today I decided it was time to take my crafts outside so spent a few hours this afternoon making new casting sculptures.


Last week I went on holiday to Norfolk and visited Southwold which was full of seaside inspiration (ok so perhaps I am a little preoccupied by seaside themes but we can't help what inspires us can we?!)


These will be used to make a plaster mold at a later date so that I can turn the design into 3d glass.

Which is your favourite?
What other items should I add to the seaside collection?

Sunday, 20 March 2011

glass casting results

So I managed to restrain myself from turning the kiln on for 6 days!!! Are you as impressed as I am?! I'll admit I was going to put it on sooner but on Tues I bumped into Sue Chalk and she said she'd recommend leaving the molds to dry out for about a wk so I sensibly listened to her advice.


After 30hrs in the kiln I broke open the molds and this is what I found. Some of the edges were a little sharp, especially on the lagoon green shell which was the one that had got buried in the plaster, so I had to start grinding off the edges.


I love the level of detail that remains in the glass after its cast.


Last week I experiemented with fusing the lead crystal glass into flat shapes and was quite pleased with the results. I'm now wondering whether to use shapes like this as a base to put my sculptures on top of. What do you think?


What colour combinations/contrasts do you like best? I think I prefer the green shell on the bluey base, do you agree? mmm decisions decisions.....and what shall I get making next?....oooh the possibilities are endless.


glass casting 1

Back in October I went on a glass casting workshop with Sue Chalk and have finally started to experiment with it at home now. All it took for me to get going was discovering that the gorgeous lead crystal glass I needed was on sale at Glass from The Past in Billericay and I was away :o)

Last weekend while I sat on a craft stall at Hylands House I spent several hours making mini sculptures. Using plasticine, shells, a pencil and a craft knife I began to create the 3d forms I wanted to cast in glass.


Now anyone who knows me won't be surprised to hear that I was far too keen to see how they would come out to wait for too long to make the molds. By sunday evening my kitchen looked a bit of a mess with plastic pots, a jug, bags of glass, newspaper, plaster, weighing scales and various other bits n bobs cluttering the worksurfaces.

Some of the castings worked perfectly....
...but the one with the air bubbles didn't look quite so good....
 
...the plasticine had come unstuck from the base and moved inside the mold but armed with a handy craft knife to dig the plasticine out happiness was restored :o)


By the time I went to bed on Sunday evening the glass was secured in the molds ready to go in the kiln

All that was needed was patience in waiting for the molds to dry out before I could turn the kiln on....and that's not something I'm too good at when something this new and exciting is concerned. How long will I be able to wait before I programme the kiln?

Thursday, 17 February 2011

Needlecraft thats just my cup of tea!

Having watched Kirstie's Homemade Home in the Autumn last year I fell in love with these gorgeous cushions by Emily Peacock. I guess like most people I'd never seen any kind of needlework thats so modern like these designs. I'd had a traditional image of landscape picture or samplers. As a child I'd made many a cross stitch in school holidays and bought my mum a couple of kits a few years back for a Christmas present. She's not quite finished them but is quicker than my sister who's still trying to finish one she started around 15yrs ago!!!

I've just bought myself a kit for 'HUG' and am hoping it doesn't take me as long to do as my sister's 'country companions' kit.

Designers like Emily Peacock and Granny Knits have become firm favourites for me. I'm following them with enthusiasm on Facebook and came across this link on Emily Peacock's page, which is all about contemporary needlepoint. Take a look if you are as keen on this style of work as me and you won't be disappointed. 


Wednesday, 16 February 2011

My kitchen door design

For a while now I've wanted to learn how to lead glass so that I can create a glass design for my kitchen/hallway door. In January I went on a leading day workshop and have now finished designing my 1st piece. I'm slightly worried it could be a challenge too far but maybe if I knew what was coming I'd not set myself such a challenge and therefore wouldn't get better so quickly. I remember doing the same when I started glass fusing and regretted cutting sharp curves in opaque glass as I couldn't see what I was doing but I persevered and Mum eventually got her bowl (but not quite on time for her birthday! oops)
.


I've decided to combine fusing and leading in this piece (see what I mean about doing something challenging for a 1st piece!) and will fuse the 'eyes' and the head piece of the peacock. This way I should be able to get a bit more detail in the work and create some added interest. Before doing too much more cutting out I need to experiment with the fusing just incase the pieces need adjusting to fit the pattern. I don't want to have to recut lots of pieces because the fused elements 'grow' in the kiln as the glass melts.

Watch this space to see the trials and tribulations of making the peacock and share my surprises along the way too...

Sunday, 23 January 2011

The outcomes of the baby feet/hand casting

Part 2 of casting a baby's foot for posterity!

These are the outcomes of our 1st try at casting a baby's feet and hand. As you peel away the rubbery alginate mixture its amazing just how much detail you start to see on the plater cast inside. With the pink from the mix slightly dying the plaster it looks spookily real. We were quite relieved to see the pink fade though as the plaster dried out!

A foot starting to emerge from the the mold. Its looking all wrinkly like the foots been in a bath for too long!

We were impressed with our creations and surprised ourselves at how amazingly real they looked. You can also see which ones have been exposed to air for longer as the pink becomes less bright.

We needn't have worried about the fist after all. It came out the best of all the casts.

An adorable little foot...ahhhhh.
So glas we didn't buy one of those kits from the shops and tried something a little differernt instead. The risk definitely paid off :o)

Wednesday, 19 January 2011

copying other peoples designs is wrong

This evening I dropped into Twitter to discover lots of people I follow retweeting posts from a designer with the user name @SheDraws  Today a friend of hers discovered that Claire's Accessories have plagerised a necklace design and have been selling it in their shops. If you follow the link below you will be able to read @SheDraws blog post about this and see examples of the 2 necklaces. They are scarily similar and clearly show no morals on the part of Claire's or even any attempt to make slight design changes.

http://drawglueglittermake.blogspot.com/2011/01/claires-accessories-have-copied-me.html

Things like this make me so angry and are just so wrong. Designers need the credit they deserve for their hard work and not to be treated like this. If you feel strongly about this issue to please pass it on and avoid shopping in Claire's. Go to a real crafter for a quality piece of jewellery instead.